ShopDreamUp AI ArtDreamUp
Deviation Actions


Suggested Deviants


Suggested Collections


You Might Like…


Featured in Groups


Description
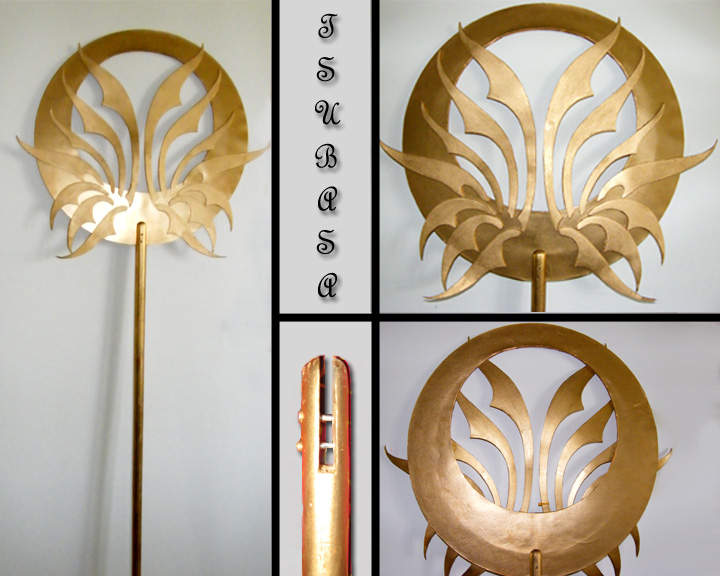
Tsubasa Reservoir Chronicles: Sakura’s Art Book Staff Tutorial
Staff= Foam. Lots and lots of foam. This was my favourite part of the cosplay to make, but also probably the most difficult part. I ended up working frantically on this the last three days before Anime North 09. It is a slightly modified version from the original art book design for various reasons. Anyhoot, here are some notes on it for anyone who is considering doing this cosplay.
The HANDLE: Mr. Broomstick
It was just a wooden broomstick that I spray-painted gold. I suggest wood because I figured that wood would hold onto the spray paint better than a smooth plastic handle, but if anyone has success with plastic, let me know. ^_^The length of the broomstick is up to you depending on your preferences, the size of the head of your staff, and your ability to wield a blunt trauma weapon safely in large crowds. I made mine go up to my shoulder. The top of the broomstick is rounded with a vertical notch cut into the centre. This is where the head of the staff slips in snugly, and is secured by two screws.
Pros: This allows for easy disassembly for transportation in a regular-sized car. (If you have a van, or you aren’t traveling with four other otakus in a normal car, then you could probably fit it in one piece on the back seat.)
Modifications: The art book design includes two prongs that stick out from the handle and curve around the head of the staff. I did not incorporate them in my staff for three reasons.
1. Safety hazard- the prongs stick out pretty far in both directions. I was worried that they could poke someone’s eyes out in a crowd.
2. I didn’t like the way they looked.
3. I did not know how to attach them, and they would certainly break off if I made them out of foam.
The HEAD: The evil known as “Do not leave till the end”
Crescent-shaped BASE: Theoretically, you could simply cut this out of wood. However, I only had a simple handsaw, so while I could cut the outer circle, I couldn’t cut out the inner circle (or maybe there is a way, but I’m not particularly handy with tools). Using cardboard and an exacto-knife was another option, but cardboard isn’t durable, doesn’t always cut cleanly, the cross-section looks unprofessional unless you cover it up, which is extra work. Also, you don’t often see flat objects that are perfect circles on the outside, but crescents on the inside at art stores. After much running around, I found a flat, regular ring made out of material that was not quite cardboard, but not quite wood or plywood either (hmm…. Really, really compressed paper?). It’s one of those rings that you use to grow decorative flower wreaths on, and can be found in various sizes at Michael’s.
The next issue was to give the inside of the ring a crescent shape, while keeping the gap in the shape of a perfect circle. The back view of the base is included here to show the ridges where I added crescents of foam and glued the edges to the inside of the ring using cement glue (better to be safe than sorry). Tracing out templates of the shapes and checking their placement on the ring before cutting the foam is a good idea to improve symmetry. The foam was simply the kind that little kids use in crafts, and can be bought in sheets at the dollar store. Afterwards, trace the modified ring into bristle board, and add the bristle board onto both sides of the modified ring to hide the edges where the foam meets the ring to give a seamless crescent.
Pros: Very inexpensive. Because of the compressed paper that the ring was made out of, the base was nearly as durable as wood, but light and easy to carry, like cardboard.
Cons: Surprisingly time-consuming. Measuring how much to add onto the inner edge was a pain in the ass- you try drawing a huge, perfect circle without a compass. -_-;; Also, get large sheets of foam so that you don’t have to spend extra time tracing, cutting, and piecing together multiple foam segments of the crescent.
Modification: There is actually also supposed to be a raised border near the outside edge of the base, but I did not have time to make it.
WING DESIGN: I had to eyeball the design because the art book illustration doesn’t show the staff very clearly. I suggest tracing the completed base onto paper and sketching a scale model of the wings on top to get a good approximation of the size, curve, and proximity of each of the feathers in relation to the base. I used the sketch to make templates for each pair of feathers. Then, I traced the templates onto sheets of foam and bristle board, and glued the two together. Foam tends to curl, so I placed a light book on top of the feathers to keep them straight while drying.
Pros: The foam serves to give the feathers a raised edge on the base (depending on how thick your foam sheets are, you may want to use two layers), and the bristle board backing supports the parts of the feathers that aren’t glued onto and supported by the base.
Cons: The feathers still get damaged easily. You can probably see in the pictures that the feather tips that protrude from the outer edge of the base have developed creases from where doorways, car interiors, luggage, and fellow otakus have bumped into them. I even made the feathers shorter than the original to avoid hitting people, but it wouldn’t be Murphy’s law of disorder if things were that easy. ^_^;; The foam feathers makes the head of the staff hard to transport safely- you can’t put anything on top of it for fear of bending or marking it. However, they surprisingly don’t break off. If you are spending more than one day at a con, it would be best to bring extra gold paint to cover up day-to-day damage. Wood might be safer. Heaver and more time-consuming, but definitely safer for the staff (if not for the careless bystander).
Note: I spray-painted the base and each feather separately before gluing them together, but glue makes the spray paint come off sometimes, so it might be safer to glue everything first, and then spray paint.
Well, I hope this was helpful, and good luck on your cosplay!
Image size
720x576px 145.13 KB
© 2009 - 2024 Sakura-Seraphim
Comments47
Join the community to add your comment. Already a deviant? Log In
TEACH ME NOW!!!